Monday, September 30, 2013

Chewy Moist Healthy French Bread.

Today has been a slow day, school, housework, and a little cooking.

I try to make bread more often than buying it because its cheaper and more delicious. I also love to know exactly what is in the things my children are eating. I have tried this amazing Amish White  Bread recipe a ton of times and my family usually eats a whole loaf in one evening. There is nothing especially healthy about this bread but it is home made.

Today I was trying to make a bread with a little more substance and a little healthier. So I found a basic french bread recipe and substituted one third of the flour with whole wheat and used avocado oil instead of cheap vegetable oil.


Here is the recipe:

2 cups warm water

1 tablespoon yeast1 tablespoon avocado oil1 tablespoon agave syrup2 teaspoons salt3 -5 1/2 cups bread flour
2 cups whole wheat flour

Directions:
Dissolve yeast in warm water (110 degrees) and agave in large bowl; allow yeast to proof or foam (about 10 minutes).Add salt, oil, and 3 cups flour; beat for 2 minutes.Stir in 2 cups flour to make a stiff dough. (I always start with the whole wheat)Knead until smooth and elastic, about 10 minutes.5 Place in oiled bowl, turn dough to coat all sides, cover and let rise until doubled.Punch down and divide in half.Shape dough into two long slender loaves.Grease and sprinkle with cornmeal either a french bread pan or large cookie sheet.Place loaves in pan and cut diagonal gashes on top of each loaf (I use scissors).10 Cover and let rise until doubled.11 Bake at 375 degrees for about 30 minutes.12 Note: You can sprinkle or spray water on the loaves during baking if you want a really crunchy crust.

adapted from food.com

here is what it turned out like, 


We waited as long as we could, and then slathered a little almond butter onto the warm slices and called it lunch. The crust turned out crunchy and chewy, and the inside was tender and soft, in fact thinking about it makes me want another slice. 


Thursday, September 26, 2013

Lotion Bars for Stocking Stuffers


I know what you are thinking, "Stocking stuffers?!? It's still September!" and I can see your point. But my holiday shopping list is really long. I have a lot of big families in my family. So I think about gift giving all the time, and am always for finding great deals and storing them away until needed.

Sometimes this backfires on me, my kids find a bag of toys in the top of my closet and make a tuesday morning christmas just for them.  But most of the time it really helps me stick to a tight budget, or save some money to spend on a place that would normally get overlooked, like myself or my husband.


So I found an easy lovely lotion bar recipe from this cute blog and thought immediately my mom and sisters would love that. They are all sensitive to perfumes and fake stuff so they usually spend a fortune on all natural skin care products.

Naturally I changed the recipe to suit what I had in the kitchen, but it works out basically the same.

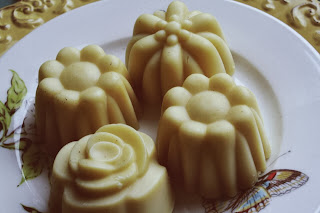
I used 1 part beeswax and 2 parts coconut oil. I did not bother with any scents as the beeswax and coconut oil smelled amazing. Melt together on low heat until totally liquid, then pour in a mold. I happen to have an amazing flower shaped silicone cupcake pan. (Thanks to my mother in law and whoever invited her to a pampered chef party)


Don't they look delicious? Anyway I have used these all summer, and they are amazing. I gave them to my family to beta test and they all beg for more. My little sister uses these instead of shaving cream and is shaving less often with no need to moisturize after. They are amazing, and I will just keep making more.


Don't have the time to make your own. These will definitely be on my Etsy site along with my husbands homemade olive oil soap sometime in the next few weeks.

Wednesday, September 25, 2013

5 Minute Chocolate Overload Cookies

It's been one of those weeks, you know one where its Wednesday and you are already complaining about what a long week you have had. I feel like I have done thirty loads of laundry in the last two days, realistically its been like ten. It is still a huge amount, ah the fun of seven people in one house. Anyway while another load is in the wash (and only like three to go!) I decided to whip up some amazingly delish cookies.

I call them 5 Minute Cookies, because thats about how long they take to mix up and how long they take to disappear.

Preheat Oven to 350 degrees
makes about 2 and 1/2 dozen

2 sticks unsalted butter
1/2 cup granulated sugar
1/2 cup brown sugar
2 eggs
1 tsp vanilla
1/3 cup cocoa powder
1 1/2 tsp baking powder
1/4 tsp salt
2 cups all purpose flour
3/4 cup slivered almonds
1 package (or about 1 1/2 cups) chocolate chips

Throw the butter and sugars into the mixer, and beat on medium till light and fluffy (do not add any more sugar or the cookies will be too sweet to eat) add the eggs, add the vanilla, cocoa, baking powder, and salt. I never sift my dry ingredients together so adding the baking powder and salt before the flour ensures that no one gets a salty bite. Turn the mixer down to low and add the flour, almonds and chocolate chips. Stop the mixer immediately after the chocolate chips are added and mix them gently by hand if needed. Scoop onto parchment lined cookie sheets and bake for about 15 minutes for a soft cookie and 17-19 for a crispier cookie.

Let cool for as long as you can wait (at least till the chocolate doesn't burn your tongue) and enjoy.


I am just hoping they last till my husband gets home from work. 

Bats and Neon and Vampire Pumpkins OH MY!

This weekend is the last one in September, which means at my house it's time to decorate for halloween! Yay I love this time of year, the weather is getting cold, the menus are getting full of baked goods and its time to start planning all the winter holidays.

The theme for halloween this year is Glowing! My kids are a little too young for anything spooky so the front porch light is getting a black light lightbulb and the decorations will be neon. I am also buying up tons of fun glow in the dark items from places like Target and Dollar Tree.

I found a few amazing ideas on Pinterest and here are two that made the cut, with a few minor changes to make it work for my family.

Neon and Bats

This pin was created using a bat cut out and sponging neon colors over it. I love the look. On sunday my family will be using white butcher paper (which we usually have in the house) and we will let the kids basically paint long sheets with as much neon paint as they want. Then the older kids (and those of us who still behave like kids as often as possible) will cut and paste black construction paper (which we also have on hand) bats to the background. The plan is to hang these all around the front porch to make a pretty large decoration for almost no cost. I will post pictures of our version next week.

Vampire Pumpkins


Aren't these the cutest things? I feel like I saw somewhere that this original idea came from Martha Stewart, but i am not positive, I couldn't find a link to it on her website. 

My boys helped me make a few pumpkins like this:


These are the carve able pumpkins from the dollar store. I loved the price and the fact that they won't decay but they definitely looked like the cost a dollar, so i will probably invest in some white pumpkins that are real a little closer to halloween. Anyway we sprayed them white and added glow in the dark fangs and glow in the dark mustaches that both came from Target. The eyes I had in my craft kit but I believe they are available in a huge pack at the dollar store. All told I make 6 pumpkins like this for $9. That includes a new can of white spray paint. This was easy enough for my kids to help with, but it wasn't very labor intensive so they we're happier playing with the finished project than making them.

We will also add a few big pumpkins to the front porch and maybe one of those wreaths from pinterest and the house should look fairly festive!

Saturday, September 21, 2013

Pinterest Dinner Board

In an attempt to eat healthier and be more organized, I have decided that I must make a meal plan.  This is not the easiest thing in the world for me, but I am going to do it.

I already have a ton of food on my Pinterest boards, so I created a new one.

Dinner this week 

And (fingers crossed) every saturday I am going to update the board with all new ideas for dinner, create a shopping list, and then follow through by making those items for dinner all week.

 Doesn't this soup from Rachael Ray look delish? My family will be eating this for dinner on Thursday, I will let you know how it works for me and if my picky kids will even try to eat it. 

So here is my shopping list for the week:

Shopping List – Dinner this week – 9/22-9/28
Already Have  

From Pantry
2 cans corn
2 cans black beans
1 can tomato sauce
1 can tomato paste
8oz Penne
½ cup chicken stock
2 cups marinara sauce
1 cup dried lentils
4 cups beef stock
¾ cup stone ground polenta
¼ cup brandy
½ cup panko bread crumbs

From the fridge
onion
2 stalks celery
garlic
1 beer
butter
fresh peas
fresh basil
feta
6 eggs
5oz fresh shredded cheese (Mexican blend)
carrots
milk

Spices
cumin, coriander, oregano, cilantro, chili powder
salt and pepper, thyme, dried basil, dried parsley, 2 bay leaves, fresh rosemary, dried chives

Need to Buy   

Meat
1lb ground beef
1lb pork sausage

Canned Goods/Condiments
2 cans chili beans
Red wine vinegar

Dairy
1 cup grated parmesan
½ cup ricotta
grated pecorino Romano cheese
1/3 cup soft goat cheese

Produce
Spinach
Apple
5 bell peppers
1 pound asparagus
2 cups cherry tomatoes, 2 large tomatoes
1 pound butternut squash
2 cups cooked spaghetti squash

I potato

* Here's hoping this becomes a habit*